0

DropDownList Validation Using JQuery JavaScript In Asp.Net

This post explains DropDownList validation Using Jquery and JavaScript in Asp.Net where DropDown is either bind with SqlDataSource or listItems.

Place one drop down and button on the page in design view and add JQuery javascript file in solution and add it's reference in head section of page. write following JQuery script in head section of page.

   1:  <head runat="server">
   2:  <title></title>
   3:   
   4:  <script src="Scripts/jquery-1.7.2.min.js" type="text/javascript"></script>  
   5:  <script type="text/javascript" language="javascript">
   6:     $(document).ready(function() {
   7:        $('#Button1').on('click', function(e) {
   8:        var selectedText = $('#DropDownList1     option:selected').text().toLowerCase();
   9:         if (selectedText == 'select') 
  10:          {
  11:            alert('Please select any language.');
  12:            e.preventDefault();
  13:          }
  14:          else
  15:                  alert('You selected ' + selectedText);
  16:          })
  17:          
  18:            
  19:   })
  20:      
  21:  </script>
  22:      
  23:  </head>


HTML Source of Drop Down And Button

   1:  <asp:DropDownList ID="DropDownList1" runat="server">
   2:  <asp:ListItem>Select</asp:ListItem>
   3:  <asp:ListItem>C#</asp:ListItem>
   4:  <asp:ListItem>VB</asp:ListItem>
   5:  <asp:ListItem>Java</asp:ListItem>
   6:  <asp:ListItem>C</asp:ListItem>
   7:   </asp:DropDownList>
   8:          
   9:  <asp:Button ID="Button1" runat="server" Text="Button" />


Now if DropDownList is getting populated from DataBase by SqlDataSource then we need to set AppendDataBoundItems property of dropdown to true and add one list item with text Select at 0th index in Page_Load event.

   1:  <asp:DropDownList ID="DropDownList2" runat="server" 
   2:                    AppendDataBoundItems="True" 
   3:                    DataSourceID="SqlDataSource1" 
   4:                    DataTextField="ProductName" 
   5:                    DataValueField="ProductID">
   6:  </asp:DropDownList>
   7:  <asp:SqlDataSource ID="SqlDataSource1" runat="server" 
   8:  ConnectionString="<%$ ConnectionStrings:TestDbConnectionString %>" 
   9:  SelectCommand="SELECT [ProductID], [ProductName] FROM [Products]">
  10:  </asp:SqlDataSource>
  11:      
  12:  <asp:Button ID="Button2" runat="server" Text="Button" />


write following code in code behind.

protected void Page_Load(object sender, EventArgs e)
    {
        DropDownList2.Items.Add(new ListItem("select", "0"));
    }


And write following JQuery code in head section of html source of page.

   1:  <script type="text/javascript" language="javascript">
   2:  $(document).ready(function() {
   3:                 
   4:     $('#Button2').on('click', function(e) {
   5:        var selectedValue = $('#DropDownList2').val();
   6:        if (selectedValue == 0) 
   7:         {
   8:            alert('Please select any product.');
   9:            e.preventDefault();
  10:         }
  11:              else
  12:                 alert('you selected product with ID ' + selectedValue);
  13:          })
  14:      
  15:      })
  16:      
  17:  </script>


If we want to use JavaScript Instead of Jquery then write code in following way

   1:  <script type="text/javascript">
   2:         
   3:   function Validation() {
   4:       var selectedValue =       document.getElementById('<%=DropDownList2.ClientID%>').value;
   5:        if (selectedValue == "0") 
   6:        {
   7:            alert("Please Select Product");
   8:        }
   9:        else {
  10:                  alert("You selected " + selectedValue);
  11:              }
  12:          }
  13:  </script>


Call this function in OnClientClick Event of button

   1:  <asp:Button ID="Button2" runat="server" Text="Button" OnClientClick="Validation()"  />

0

Validate DropDownList Using Required Field Validator Asp.Net

This post explains How to Validate DropDownList Using RequiredFieldValidator In Asp.Net when either Dropdown is populated using SqlDataSource or when Drop Down is populated using List Items.

Place one dropdown list, button and requiredfieldvalidator controls in design view of page and add list items in HTML source of page as mentioned below.

   1:  <asp:DropDownList ID="ddlLanguage" runat="server">
   2:  <asp:ListItem>--Select--</asp:ListItem>
   3:  <asp:ListItem>C#</asp:ListItem>
   4:  <asp:ListItem>VB</asp:ListItem>
   5:  <asp:ListItem>Java</asp:ListItem>
   6:  </asp:DropDownList>


Set ControlToValidate, InitialValue, Error Message properties of required field validator as follows.

   1:  <asp:RequiredFieldValidator ID="rfvDdl" runat="server" 
   2:     ControlToValidate="ddlLanguage" 
   3:     ErrorMessage="Please Select a Language" 
   4:     InitialValue="--Select--" 
   5:     SetFocusOnError="True">
   6:  </asp:RequiredFieldValidator>


If dropdownlist is getting populated by SqlDataSource or ObjectDataSource at runtime then we need to set AppendDataBoundItems property of dropdown to true and add one list item at 0 or -1 index in Page_Load event of page.

   1:  <asp:DropDownList ID="ddlProducts" runat="server" 
   2:          AppendDataBoundItems="True" 
   3:          DataSourceID="SqlDataSource1" 
   4:          DataTextField="ProductName" 
   5:          DataValueField="ProductID">
   6:  </asp:DropDownList>
   7:   
   8:  <asp:SqlDataSource ID="SqlDataSource1" runat="server" 
   9:          ConnectionString="<%$ ConnectionStrings:TestDbConnectionString %>" 
  10:          SelectCommand="SELECT [ProductName], [ProductID] FROM [Products]">
  11:  </asp:SqlDataSource>
  12:   
  13:  <asp:RequiredFieldValidator ID="RequiredFieldValidator1" runat="server" 
  14:          ControlToValidate="ddlProducts" 
  15:          ErrorMessage="Please select a product" 
  16:          InitialValue="0" SetFocusOnError="True">
  17:  </asp:RequiredFieldValidator>


Write following code in Page_Load Event in code behind.

protected void Page_Load(object sender, EventArgs e)
    {
        ddlProducts.Items.Insert(0,new ListItem("Choose Product","0"));
    }


Build and run the code.

0

ASP.NET TextBox Remaining Character Counter JavaScript

This example illustrate how to count and show remaining characters in TextBox using JavaScript in Asp.Net.
Create a new website in Visual Studio and place one TextBox and Label on the default.aspx page in design mode.

Go to HTML source of page and write a JavaScript function named Count in head section of page to count remaining characters in TextBox.

Set the MaxLength property of TextBox to 10 chars.


   1:  <head runat="server">
   2:  <title>Remaining Characters Counter</title>
   3:  <script type="text/javascript">
   4:  function Count() {
   5:   
   6:  var i = document.getElementById("TextBox1").value.length;
   7:  document.getElementById("Label1").innerHTML = 10 - i;
   8:          }
   9:  </script>
  10:  </head>

Call this javascript function in onkeyup event of textbox.
   1:  <asp:TextBox ID="TextBox1" runat="server" 
   2:          MaxLength="10" onkeyup="Count()">
   3:  </asp:TextBox>


0

Configure Unique Document IDs Feature In SharePoint 2010

This post explains how to Enable Activate Or Configure Unique Document IDs Feature In SharePoint 2010 For better Document Management.

Open your site collection in browser and login with administrator account

Click on Site Actions > Site Settings

Unique Document ID In SharePoint 2010


Select Site collection features from Site Collection Administration section
sharepoint 2010 document id

Activate Document ID Service
After activation it will look like shown in image 

Now go back to Site Actions > Site Settings and select Document ID Settings 

Document ID Settings
Here you can customize the document ID to begin with characters you want 


Now you can see the document ID by selecting the document and clicking on View Properties icon on top ribbon 


Alternatively you can add document id column to be displayed 

check the document, Click on Library > Modify View and check the Document ID Checkbox and finish it 


Hope this helps

1

Asp.Net Bind Populate DropDownList With JQuery And XML

In this example i'm explaining How To Populate Or Bind DropDownList With JQuery And XML In Asp.Net.
bind populate dropdownlist with jquery and xml

Add jquery library reference in head section and place one dropdown on the page.

Add one list item with select as it's value.

   1:  <asp:DropDownList ID="DropDownList1" runat="server">
   2:  <asp:ListItem>Select</asp:ListItem>
   3:  </asp:DropDownList>
   4:   
   5:  <asp:Label ID="Label1" runat="server" Text=""/>


Following is the Cities.xml file i'm using to bind dropdownlist using jquery.


    Mumbai
    1
  
    
    Delhi
      2
  
  
    Banglore
    3
  
  
    Chennai
    4
  

Add this script in head section of page.


Build and run the code.

0

AjaxFileUpload AsyncFileUpload In ModalPopUp Extender Asp.Net

This example shows how to use AjaxFileUpload Control Or AsyncFileUpload In ModalPopUp Extender Using C# VB Asp.Net.

Place ToolkitScriptManager and a button inside UpdatePanel on the page, we will open ModalPopup in click event of this button to upload files.

Create one panel on the page and add AjaxFileUpload or Ajax AsyncFileUpload in it.

Async Ajax FileUpload In ModalPopUp Extender


HTML Source
<asp:ToolkitScriptManager ID="ToolkitScriptManager1" runat="server"/>
<asp:UpdatePanel ID="UpdatePanel1" runat="server">
<ContentTemplate>
<asp:Button ID="btnUpload" runat="server" 
            Text="Upload File" onclick="btnUpload_Click"/>
            
<asp:ModalPopupExtender runat="server" 
                        ID="modelPopupExtender1" 
                        TargetControlID="btnUpload"
                        PopupControlID="popUpPanel" 
                        OkControlID="btOK" 
                        BackgroundCssClass="modalBackground">
</asp:ModalPopupExtender>
 
 <asp:Panel ID="popUpPanel" runat="server" CssClass="pnl">
 <div style="font-weight: bold; border: Solid 3px Aqua; 
                                background-color: AliceBlue">
 
 <asp:AjaxFileUpload ID="AjaxFileUpload1" runat="server" 
                     OnUploadComplete="UploadComplete" 
                     OnClientUploadComplete="Success" 
                     ThrobberID="loader" Width="400px"/>
 <asp:Image ID="loader" runat="server" 
            ImageUrl ="~/loading.gif" 
            Style="display:None"/>
 </div><br /><br />
 <asp:Label ID="lblMessage" runat="server"/><br /><br />
 <asp:Button ID="btOK" runat="server" Text="OK" />
 <asp:LinkButton ID="LinkButton1" runat="server" CssClass="close" 
 OnClientClick="$find('modelPopupExtender1').hide(); return false;"/>
</asp:Panel>
</ContentTemplate>
</asp:UpdatePanel>


If you are using AsyncFileUpload Control then don't forget to set UploaderStyle property to Traditional, other wise it will throw invalid argument error.

<ajax:AsyncFileUpload ID="AsyncFileUpload1" runat="server" 
                      UploadingBackColor="Blue" 
                      CompleteBackColor="WhiteSmoke"
                      OnUploadedComplete="SaveUploadedFile" 
                      OnClientUploadComplete="Success" 
                      OnClientUploadError="Error"
                      UploaderStyle="Traditional"/>


Add following Javascript and CSS in head section of page.


Write following code in OnUploadComplete event to save file on server.

protected void UploadComplete(object sender, AjaxControlToolkit.AjaxFileUploadEventArgs e)
    {
        string path = Server.MapPath("~/Uploads/") + e.FileName;
        AjaxFileUpload1.SaveAs(path);
    }


Build and run the code.

Download Sample Code


0

Allow Enable Anonymous Access In SharePoint 2010 Sites

This Post explains How To Allow Or Enable Anonymous Access In SharePoint 2010 Sites Collections.

1. Open SharePoint 2010 Central Administration, Go to Manage Web Applications

Allow Anonymous Access In SharePoint 2010 SItes


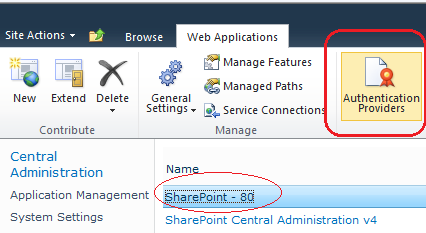
Select Your Site and click on Authentication Providers icon in the top ribbon bar 

SharePoint 2010 Enable Anonymous Access


Click on Default Zone and Check the Enable Anonymous Access CheckBox and save it

Anonymous Access


2. Select your site and click on Anonymous Policy Icon In ribbon

Anonymous Policy


Select Default Zone from dropdown and select the permissions option you want to grant to anonymous users Selecting None - No Policy is recommended )


3. Close Central Administration and open your site collection in browser with administrator account (Site for which you just had set anonymous access)

Click on Site Actions and select Site Permissions

Site Permissions


Click on Anonymous Access Icon on the top ribbon


Select Entire Web Site Option and click on OK


Now you can browse your site Anonymously without login.


Hope this helps.

4

Ajax AutoCompleteExtender In Master Page Asp.Net

This Example shows How To Use Ajax AutoCompleteExtender TextBox In Master Page In Asp.Net.

Open Visual Studio and create new website, add master page in it and design it as you want.

Create a BIN folder in application and add AjaxControlToolkit.dll in it.

I have use Northwind database to fetch names for AutoCompletion list.

Add Connection String in web.config file

<connectionStrings>
<add name="NorthwindConnectionString" 
     connectionString="Data Source=AMITJAIN\SQL;
                       Initial Catalog=Northwind;
                       User ID=amit;Password=password"
providerName="System.Data.SqlClient"/>
</connectionStrings>


Place ToolkitScriptManager on Master Page inside form tag, one textbox and Add Ajax AutoComplete Extender from Toolbox.

HTML SOURCE OF MASTER PAGE
<%@ Master Language="C#" AutoEventWireup="true" CodeFile="MasterPage.master.cs" Inherits="MasterPage" %>
<%@ Register Assembly="AjaxControlToolkit" Namespace="AjaxControlToolkit" TagPrefix="asp" %>
<!DOCTYPE html PUBLIC "-//W3C//DTD XHTML 1.0 Transitional//EN" "http://www.w3.org/TR/xhtml1/DTD/xhtml1-transitional.dtd">
 
<html xmlns="http://www.w3.org/1999/xhtml">
<head runat="server">
<title></title>
<asp:ContentPlaceHolder id="head" runat="server">
</asp:ContentPlaceHolder>
</head>
<body>
<form id="form1" runat="server">
<asp:ToolkitScriptManager ID="ToolkitScriptManager1" runat="server"/>
 
<asp:TextBox ID="txtAutoComplete" runat="server"/>
                               
<asp:AutoCompleteExtender ID="AutoCompleteExtender1" 
                          runat="server" 
                          DelimiterCharacters="" 
                          Enabled="True" 
                          ServicePath="~/AutoComplete.asmx" 
                          ServiceMethod="GetCompletionList"
                          TargetControlID="txtAutoComplete"
                          MinimumPrefixLength="1" 
                          CompletionInterval="10" 
                          EnableCaching="true"
                          CompletionSetCount="12">
</asp:AutoCompleteExtender>
                
<asp:ContentPlaceHolder id="ContentPlaceHolder1" runat="server">
</asp:ContentPlaceHolder>
 
</form>
</body>
</html>


We can set CompletionList WIdth and styles using CSS or use AutoCompleteExtender In GridView or Windows Forms Application.

Add new webservice, name it AutoComplete.asmx and write following code in it's code behind.

C#
using System.Collections.Generic;
using System.Web.Services;
using System.Data.SqlClient;
using System.Data;
using System.Configuration;

[WebService(Namespace = "http://tempuri.org/")]
[WebServiceBinding(ConformsTo = WsiProfiles.BasicProfile1_1)]
[System.Web.Script.Services.ScriptService]
public class AutoComplete : System.Web.Services.WebService {

    public AutoComplete () 
    {
    }

    [WebMethod]
    public string[] GetCompletionList(string prefixText, int count)
    {
        if (count == 0)
        {
            count = 10;
        }
        DataTable dt = GetRecords(prefixText);
        List items = new List(count);

        for (int i = 0; i < dt.Rows.Count; i++)
        {
            string strName = dt.Rows[i][0].ToString();
            items.Add(strName);
        }
        return items.ToArray();
    }

    public DataTable GetRecords(string strName)
    {
        string strConn = ConfigurationManager.ConnectionStrings["NorthwindConnectionString"].ConnectionString;
        SqlConnection con = new SqlConnection(strConn);
        SqlCommand cmd = new SqlCommand();
        cmd.Connection = con;
        cmd.CommandType = System.Data.CommandType.Text;
        cmd.Parameters.AddWithValue("@Name", strName);
        cmd.CommandText = "Select FirstName from Employees where FirstName like '%'+@Name+'%'";
        DataSet objDs = new DataSet();
        SqlDataAdapter dAdapter = new SqlDataAdapter();
        dAdapter.SelectCommand = cmd;
        con.Open();
        dAdapter.Fill(objDs);
        con.Close();
        return objDs.Tables[0];
    }
}

VB.NET
Imports System.Collections.Generic
Imports System.Web.Services
Imports System.Data.SqlClient
Imports System.Data
Imports System.Configuration

 _
 _
 _
Public Class AutoComplete
 Inherits System.Web.Services.WebService

 Public Sub New()
 End Sub

  _
 Public Function GetCompletionList(prefixText As String, count As Integer) As String()
  If count = 0 Then
   count = 10
  End If
  Dim dt As DataTable = GetRecords(prefixText)
  Dim items As New List(Of String)(count)

  For i As Integer = 0 To dt.Rows.Count - 1
   Dim strName As String = dt.Rows(i)(0).ToString()
   items.Add(strName)
  Next
  Return items.ToArray()
 End Function

 Public Function GetRecords(strName As String) As DataTable
  Dim strConn As String = ConfigurationManager.ConnectionStrings("NorthwindConnectionString").ConnectionString
  Dim con As New SqlConnection(strConn)
  Dim cmd As New SqlCommand()
  cmd.Connection = con
  cmd.CommandType = System.Data.CommandType.Text
  cmd.Parameters.AddWithValue("@Name", strName)
  cmd.CommandText = "Select FirstName from Employees where FirstName like '%'+@Name+'%'"
  Dim objDs As New DataSet()
  Dim dAdapter As New SqlDataAdapter()
  dAdapter.SelectCommand = cmd
  con.Open()
  dAdapter.Fill(objDs)
  con.Close()
  Return objDs.Tables(0)
 End Function
End Class


Build and run the application.

Find More Articles